In years past, I felt like Thanksgiving was a missed opportunity. It's so easy to get swept up by all the holiday preparation and rush, but November is the perfect time to give gratitude centerstage! I hope you'll join us in trying out some new traditions this year!
Ideas for Expressing Gratitude
1. Gratitude Tree: Make a tree from craft paper and hang on a wall. Give each guest a paper leaf to write down what they are thankful for and then attach to the tree. The tree can also be drawn with window crayons on a large window or sliding glass door. Read the gratitude leaves out loud after dinner or just allow guests to read them on their own. We have a daily tree tradition during November, which you can read about here. Another idea along those lines: a gratitude jar that family members add to and the notes are read aloud on Thanksgiving day.
2. Gratitude Tablecloth: Create a keepsake tablecloth by asking guests to write what they are thankful for with fabric pens (wash on gentle cycle and reuse every year). I like this more permanent idea for multi-generational gatherings to hold onto those fleeting years of the very young and also elders. This can also be done each year using butcher paper to cover the table.
3. Gratitude Journal Keepsake: Bring out a notebook each year for guests to write what they are grateful for -- an elevated guestbook to keep for many years and read through/add to each Thanksgiving.
4. Gratitude Toasts: If you have an extroverted family, a round of toasts is a nice tradition. Each person at the table has to make a toast (scattered throughout the meal), saying what they are grateful for or perhaps a blessing. We are big fans of reading poetry at special gatherings, as well. I love this Thanksgiving poetry collection.
5. Family Recipe Book: Collection of index cards or a notebook of the menu each year, including recipes and highlights to remember. Could also be a shared google file if you have a moving feast! I like this idea for practical reasons too. I feel like every year my husband and I look at each other and say, what did we make last year?
Ideas for Enjoying Time Together
6. Outdoor Games: Set up outdoor games for the children (and adults who aren't cooking) to play while meal prep is in full swing. Some of our favorites: corn hole, horse shoes and freeze tag.
7. Photo Station: Who doesn't love a photo station with props and signs? Create photo memories and perfect for your social media mavens.
8. Thanksgiving Craft Table: Plan according to the children's ages so they can work independently. Drawing on pressed leaves with chalk markers, paint sticks or pens, oil pastels is always a hit. Also, the kids can make their own placemats on drawing paper. I have a gratitude placemat here.
Group project: Thanksgiving mural on butcher paper painted or colored with crayons. This one would be very simple to set and clean up! Also check out the pressed leaf turkey project tutorials at the end of this post.

9. Family Walk After Dinner: I love the idea of a walk through the neighborhood before dessert is served. So good for so many reasons!
10. Delegate Dessert Service to the Kids: Adults get a chance to sit and chat while the younger children take dessert and coffee orders. The older children plate and serve.
Wishing you all a Happy Thanksgiving this year. I would love to hear about your family's traditions or if you've tried any from this list! Drop me a message or comment!
Pressed Leaf Turkey Projects
Materials
Drawing paper, card stock, cardboard
Pressed fall leaves
Construction paper
Elmer's or Tacky glue
Roller (optional)
Tape
Googly eyes
Glitter, glitter glue, oil pastels, crayons (whatever you have on-hand for the background)


Instructions
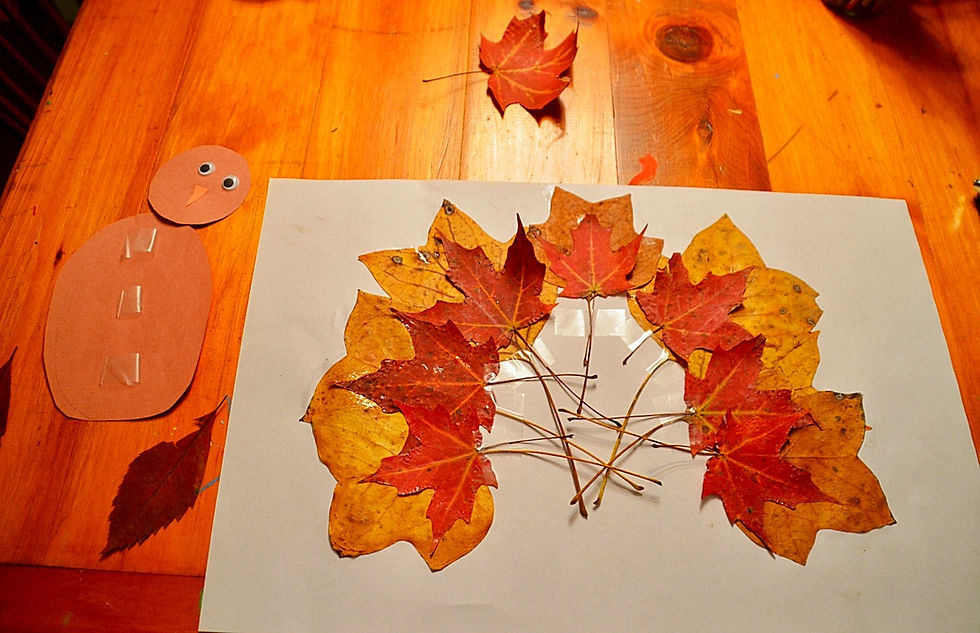
I used leaves of varying sizes and colors, but any arrangement will come out great. Layout your leaves in an upside down U-shape first to plan your design.
Once you've settled on your design, begin glueing the bottom layer of leaves for the turkey's tail. Paint the back of the leaves with glue and push flat. If you're using a roller, roll in one direction so the leaf doesn't get caught.

Then add the next layer of leaves, glueing and rolling flat as you go.

Cut out the head and body of your turkey to cover the white space of the U shape. I also secured the stems with tape. Add the beak and googly eyes (or draw the face).

Attach the body with tape or glue. We found some wing-shaped leaves, but the turkey looks good without them too.

Attach the head, draw the feet and add any background you like. Glitter is pretty much the standard at our house, but anything you have on-hand will do. He also looks cool with a plain white background.

Instructions
Draw a circle in the middle of your card stock. Draw lines from the circle outward, creating a starburst shape.

Add your first layer of leaves (or one big leaf) and cut out a circle and an oval from construction paper. Because we used oil pastels to color the background, we used Tacky glue for this project. We made the face with googly eyes and orange felt.
Keep adding and layering leaves until your heart is content!

This turkey was inspired by Art Bar's Barb Rucci, and her tutorial can be found here. We used pressed leaves instead of craft supplies. You can see many colorful examples in her post. These turkeys look great and are really simple to put together! We hot-glued a loop to the back of ours and hung it on the wall. I'm going to store it carefully and see if it survives as a decoration for next year! Elodie loved making it!


Comments